
What is a Smart View?

Smart Views lets you code your view using JS, HTML, and CSS. They are taking data visualization to the next level. Ditch the table view and display your orders on a Map, your events in a Calendar, your movies, pictures and profiles in a Gallery. All of that with the easiness of Forest.

Creating a Smart View

Forest provides an online editor to inject your Smart View code. The editor is available on the collection’s settings, then in the “Smart views” tab. The code of a Smart View is a Glimmer Component and simply consists of a Template and Javascript code.
You don’t need to know the Ember.js framework to create a Smart View. We will guide you here on all the basic requirements. For more advanced usage, you can still refer to the Glimmer Component documentations.
Your code must be compatible with Ember 4.12.

Getting your records

The records of your collection are accessible from the records property. Here’s how to iterate over them in the template section:
\{\{#each @records as |record|\}\}
\{\{/each\}\}

Accessing a specific record

For each record, you will access its attributes through the forest-attribute property. The forest- preceding the field name is required.
\{\{#each @records as |record|\}\}
  <p>status: \{\{record.forest-shipping_status\}\}</p>
\{\{/each\}\}

Accessing belongsTo relationships

Accessing a belongsTo relationship works in exactly the same way as accessing a simple field. Forest triggers automatically an API call to retrieve the data from your Admin API only if it’s necessary. 
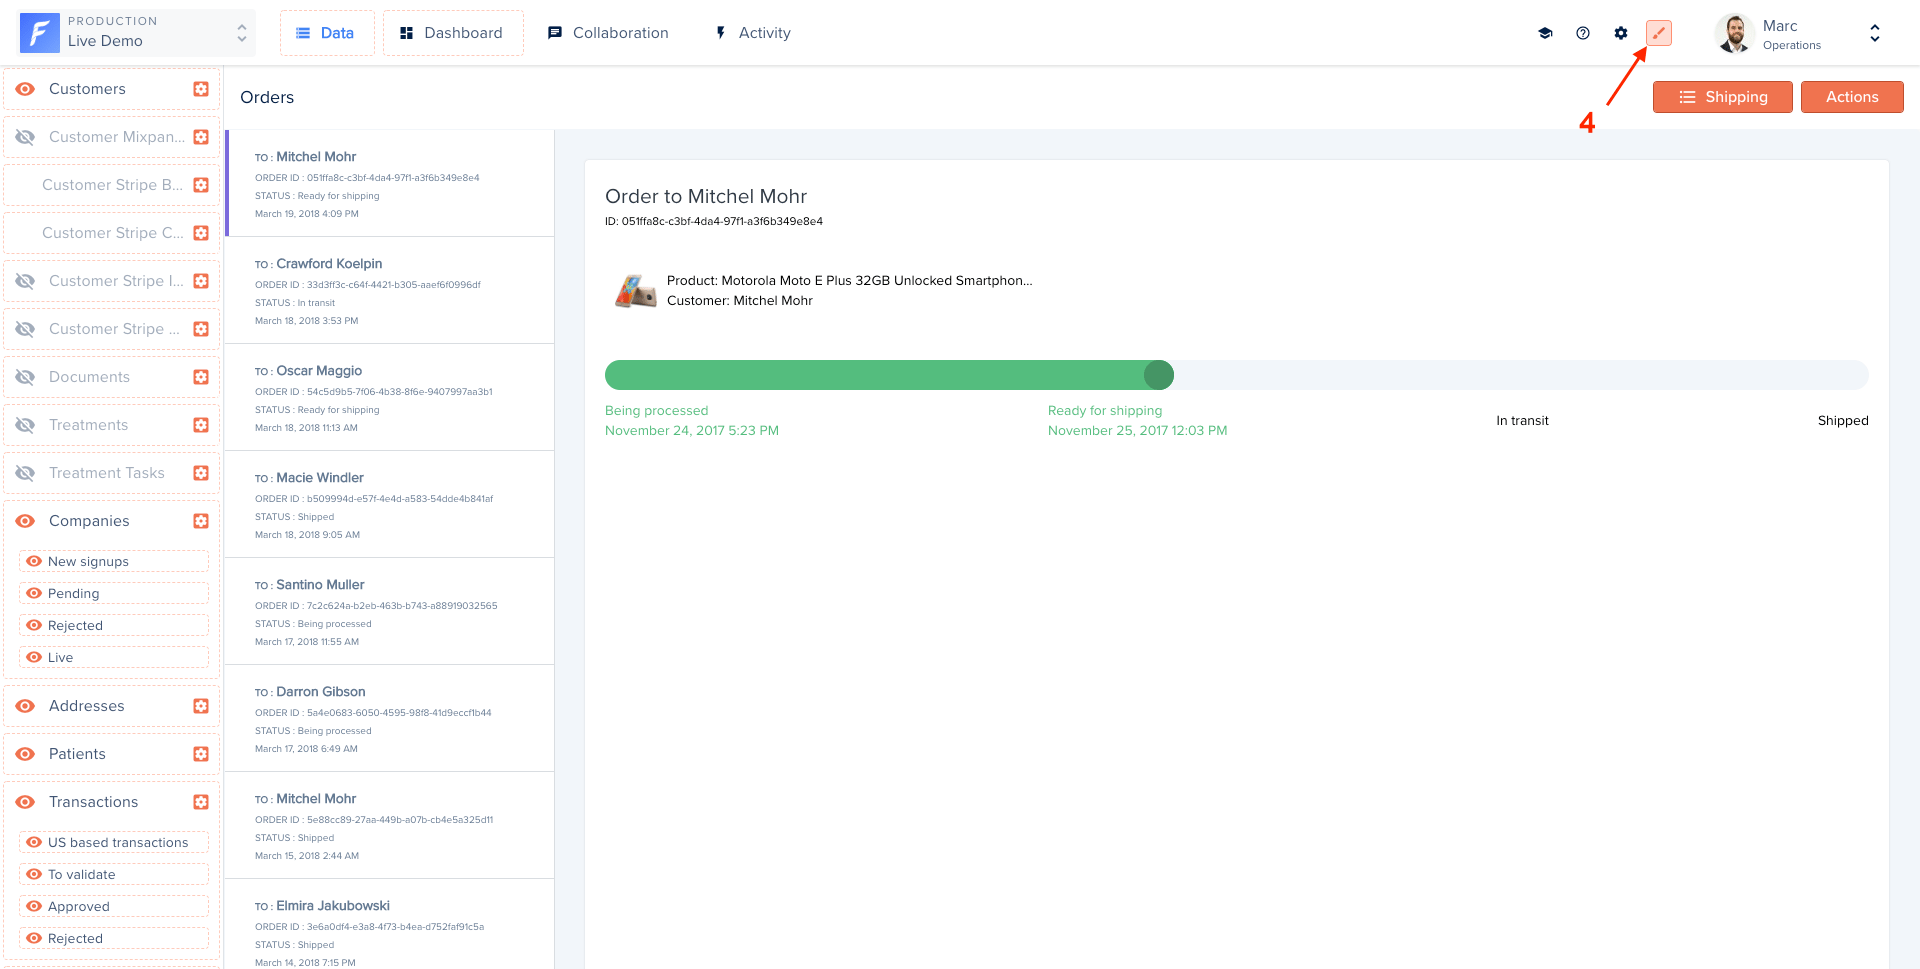
On the Shipping Smart View (in the collection named Order) defined on our Live Demo example, we’ve displayed the full name of the customer related to an order.
\{\{#each @records as |record|\}\}
  <h2>Order to \{\{record.forest-customer.forest-firstname\}\} \{\{record.forest-customer.forest-lastname\}\}</h2>
\{\{/each\}\}

Accessing hasMany relationships

Accessing a hasMany relationship works in exactly the same way as accessing a simple field.. Forest triggers automatically an API call to retrieve the data from your Admin API only if it’s necessary.
\{\{#each @records as |record|\}\}
  \{\{#each @record.forest-comments as |comment|\}\}
    <p>\{\{comment.forest-text\}\}</p>
  \{\{/each\}\}
\{\{/each\}\}

Refreshing data

Trigger the fetchRecords action in order to refresh the records on the page.
<button \{\{on 'click' @fetchRecords\}\}>
  Refresh data
</button>

Fetching data

Trigger an API call to your Admin API in order to fetch records from any collection and with any filters you want. We will use the store service for that purpose. Check out the list of all available services from your Smart View. In our Live Demo example, the collection appointments has a Calendar Smart View. When you click on the previous or next month, the Smart View fetches the new events in the selected month. The result here is set to the propertyappointments. You can access it directly from your template.
import Component from '@glimmer/component';
import { inject as service } from '@ember/service';
import { tracked } from '@glimmer/tracking';

export default class extends Component {
  @service store;

  @tracked appointments;

  async fetchData(startDate, endDate) {
    const params = {
      filters: JSON.stringify({
        aggregator: 'and',
        conditions: [{
          field: 'start_date',
          operator: 'greater_than'
          value: startDate,
        }, {
          field: 'start_date',
          operator: 'less_than'
          value: endDate,
        }],
      }),
      timezone: 'America/Los_Angeles',
      'page[number]': 1,
      'page[size]': 50
    };

    this.appointments = await this.store.query('forest_appointment', params);
  }
  // ...
};
\{\{#each this.appointments as |appointment|\}\}
  <p>\{\{appointment.id\}\}</p>
  <p>\{\{appointment.forest-name\}\}</p>
\{\{/each\}\}

Available parameters

ParameterTypeDescription
filtersObjectA stringified JSON object containing either a filter or an aggregation of several filters. A filter has: field, operator, value. An aggregation has: aggregator (and/or), conditions (array). Available operators: less_than, greater_than, equal, after, before, contains, starts_with, ends_with, not_contains, present, not_equal, blank
timezoneStringThe timezone string. Example: America/Los_Angeles.
page[number]NumberThe page number you want to fetch.
page[size]NumberThe number of records per page you want to fetch.

Deleting records

The deleteRecords action lets you delete one or multiple records. A pop-up will automatically ask for a confirmation when a user triggers the delete action.
\{\{#each @records as |record|\}\}
  <Button::BetaButton
    @type="danger"
    @text="Delete record"
    @action=\{\{fn this.deleteRecords record\}\}
    @async=\{\{false\}\}
  />
\{\{/each\}\}

Triggering a Smart Action

Please note that the smart action triggering in the context of the smart view editor can be broken as you might not have access to all the required information. We advise you to test the smart action execution from the smart view applied to the collection view.
Here’s how to trigger your Smart Actions directly from your Smart Views.

template.hbs

<Button::BetaButton
  @type="primary"
  @text="Reschedule appointment"
  @action=\{\{fn this.triggerSmartAction @collection 'Reschedule' record\}\}
/>

component.js

import Component from '@glimmer/component';
import { action } from '@ember/object';
import { triggerSmartAction } from 'client/utils/smart-view-utils';

export default class extends Component {
  @action
  triggerSmartAction(...args) {
    return triggerSmartAction(this, ...args);
  }

  @action
  deleteRecords(...args) {
    return deleteRecords(this, ...args);
  }
}
triggerSmartAction function imported from 'client/utils/smart-view-utils'has the following signature:
function triggerSmartAction(
  context, collection, actionName, records, callback = () => {}, values = null,
)
Argument nameDescription
contextContext is the reference to the component, in the smart view it is accessible through the keyword this
collectionThe collection that has the Smart Action
actionNameThe Smart Action name
recordsAn array of records or a single one
callbackA function executed after the smart action that takes as the single parameter the result of the smart action execution.
valuesAn object containing the values to be passed for the smart action fields
Here is an example of how to trigger the smart action with the values passed from the code, you only need to do it if you don’t want to use the built-in smart action form

template.hbs

<Button::BetaButton
  @type="primary"
  @text="Reschedule appointment"
  @action=\{\{fn this.rescheduleToNewTime record\}\}
/>

component.js

import Component from '@glimmer/component';
import { action } from '@ember/object';
import { triggerSmartAction } from 'client/utils/smart-view-utils';
import { tracked } from '@glimmer/tracking';

export default class extends Component {
  @tracked newTime = '11:00';

  @action
  triggerSmartAction(actionName, records, values) {
    return triggerSmartAction(
      this,
      this.args.collection,
      actionName,
      records,
      () => {},
      values
    );
  }

  @action
  rescheduleToNewTime(record) {
    this.triggerSmartAction('Reschedule', record, { newTime });
  }

  @action
  deleteRecords(...args) {
    return deleteRecords(this, ...args);
  }
}

Available properties

Forest automatically injects into your Smart View some properties to help you display your data like you want.
PropertyTypeDescription
collectionModelThe current collection.
currentPageNumberThe current page.
isLoadingBooleanIndicates if the UI is currently loading your records.
numberOfPagesNumberThe total number of available pages
recordsarrayYour data entries.
searchValueStringThe current search.

Available actions

Forest automatically injects into your Smart View some actions to trigger the logic you want.
ActionDescription
deleteRecords(records)Delete one or multiple records.
triggerSmartAction(collection, actionName, record)Trigger a Smart Action defined on the specified collection on a record.

Applying a Smart View

To apply a Smart view you created, turn on the Layout Editor mode (1), click on the table button (2) and drag & drop your Smart View’s name in first position inside the dropdown (3):
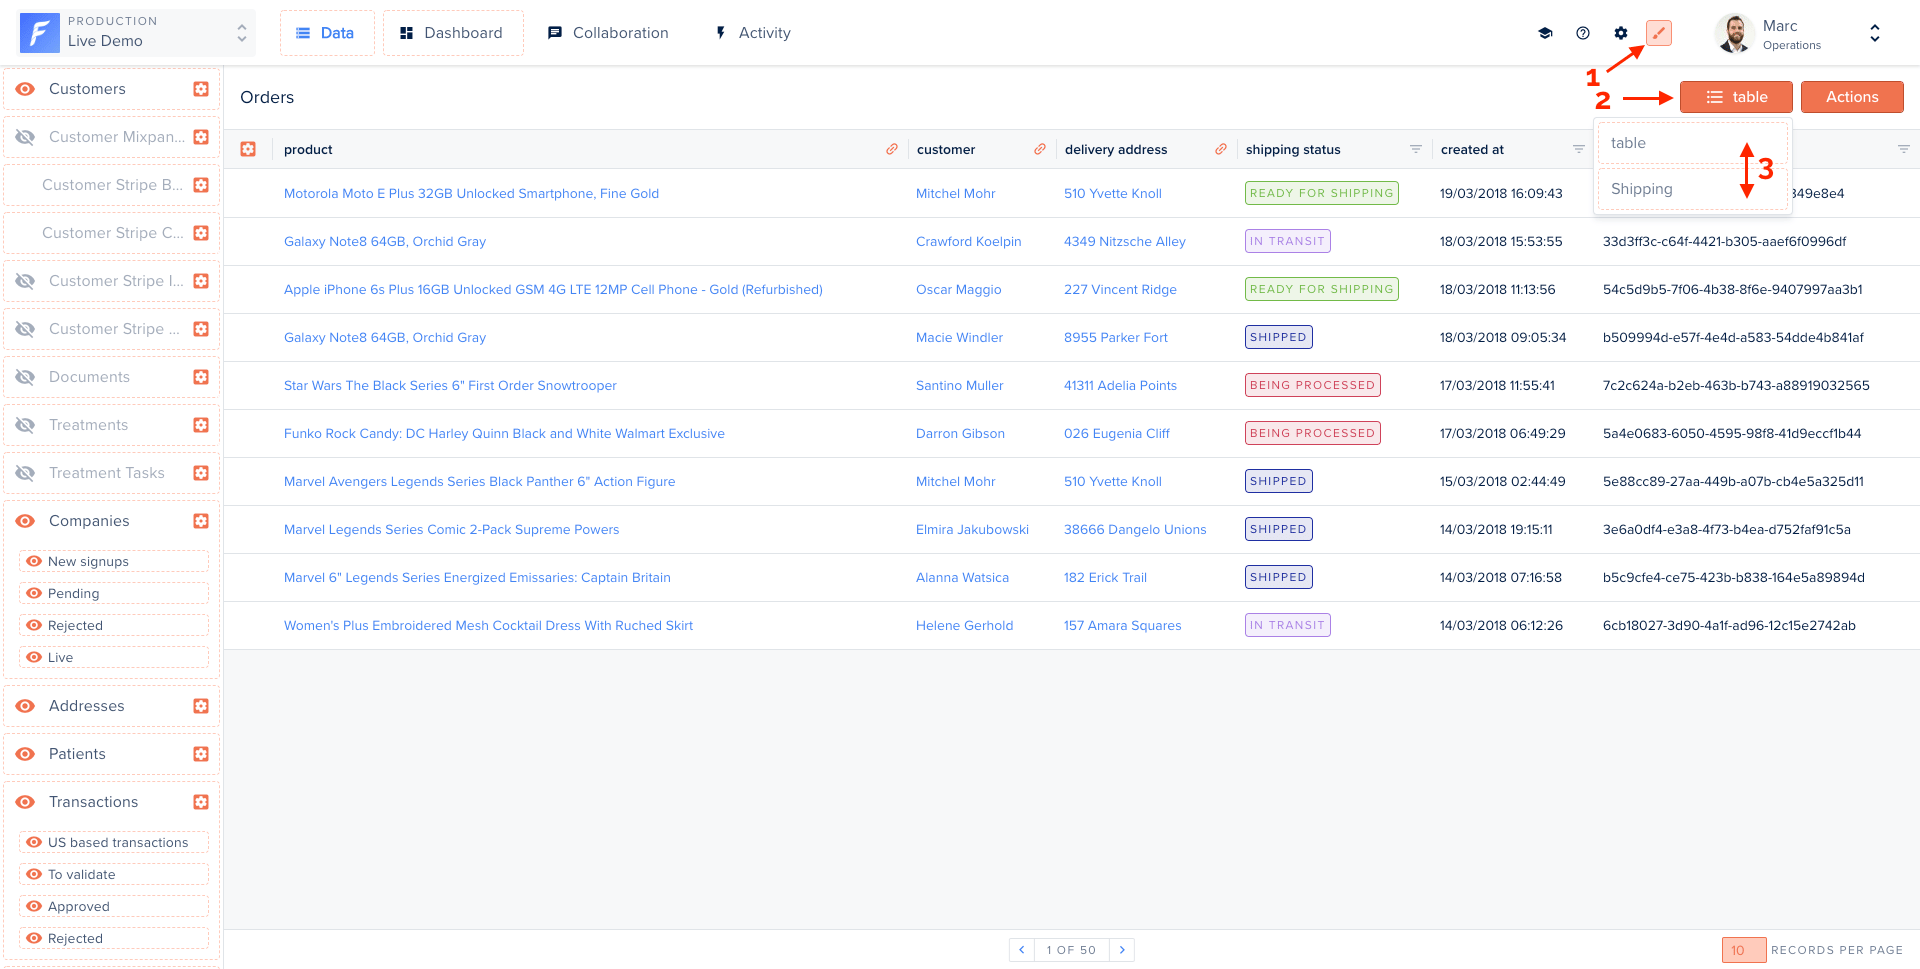
 Your view will refresh automatically. You can now turn off the Layout Editor mode (4). Once your Smart view is applied, it will also be displayed in your record’s related data.

In the summary view

As of today, it’s not possible to set different views for your table/summary/related data views.